AkVox. Your App in Your User's Language.
Get AkVox to quickly and easily localize your app into dozens of languages.
Get AkVox to quickly and easily localize your app into dozens of languages.
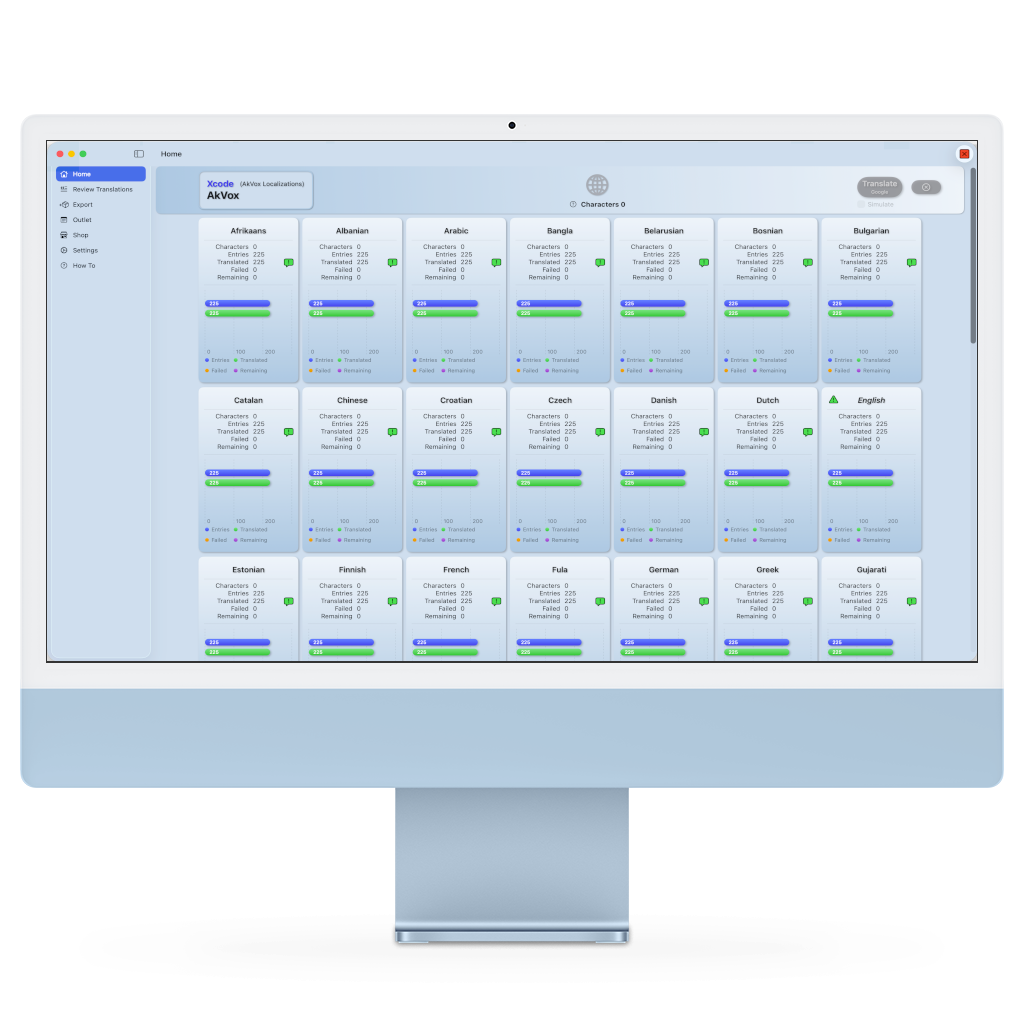
Drag an Xcode localizations folder or Android strings resource file onto AkVox
AkVox processes Apple's Xcode apps and Google Android apps.
You can try AkVox for as long as you want without being nagged to pay.
AkVox translates the text needed to publish and monetize your app.
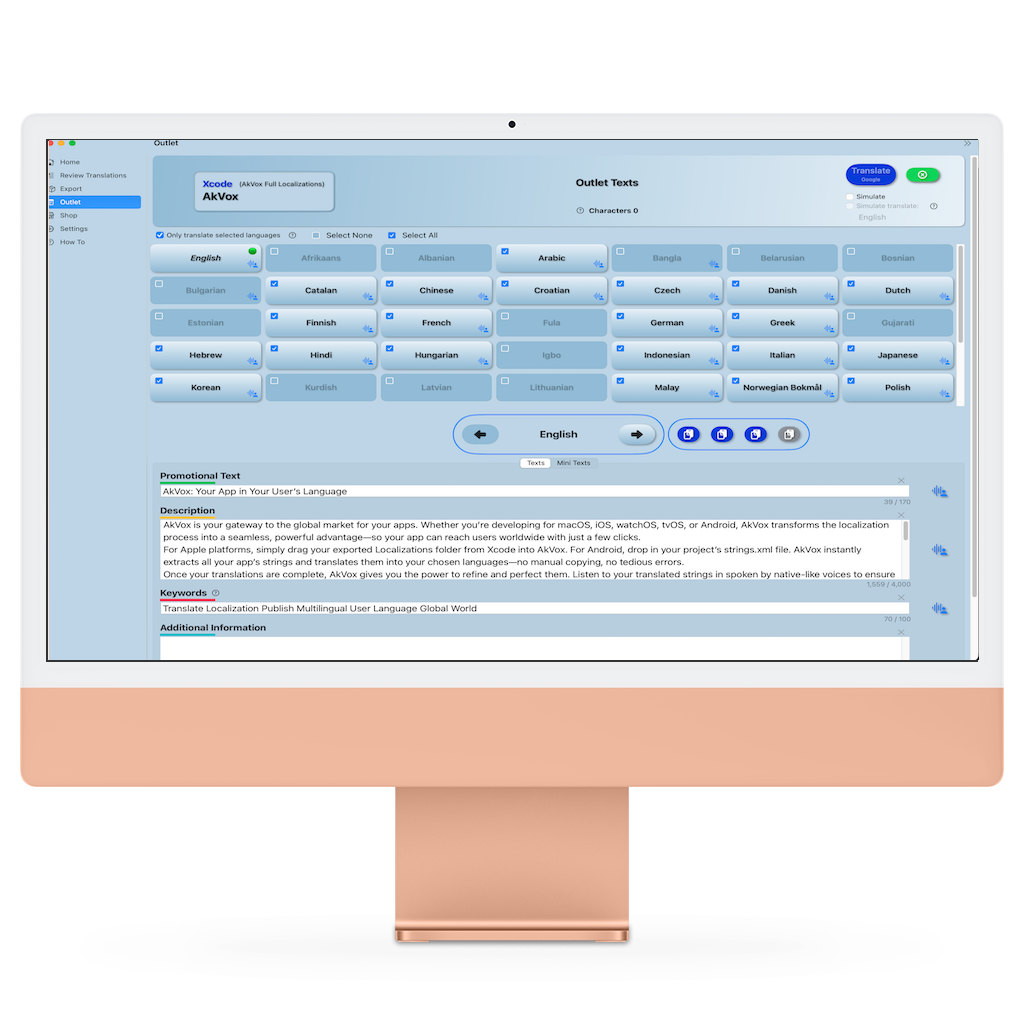
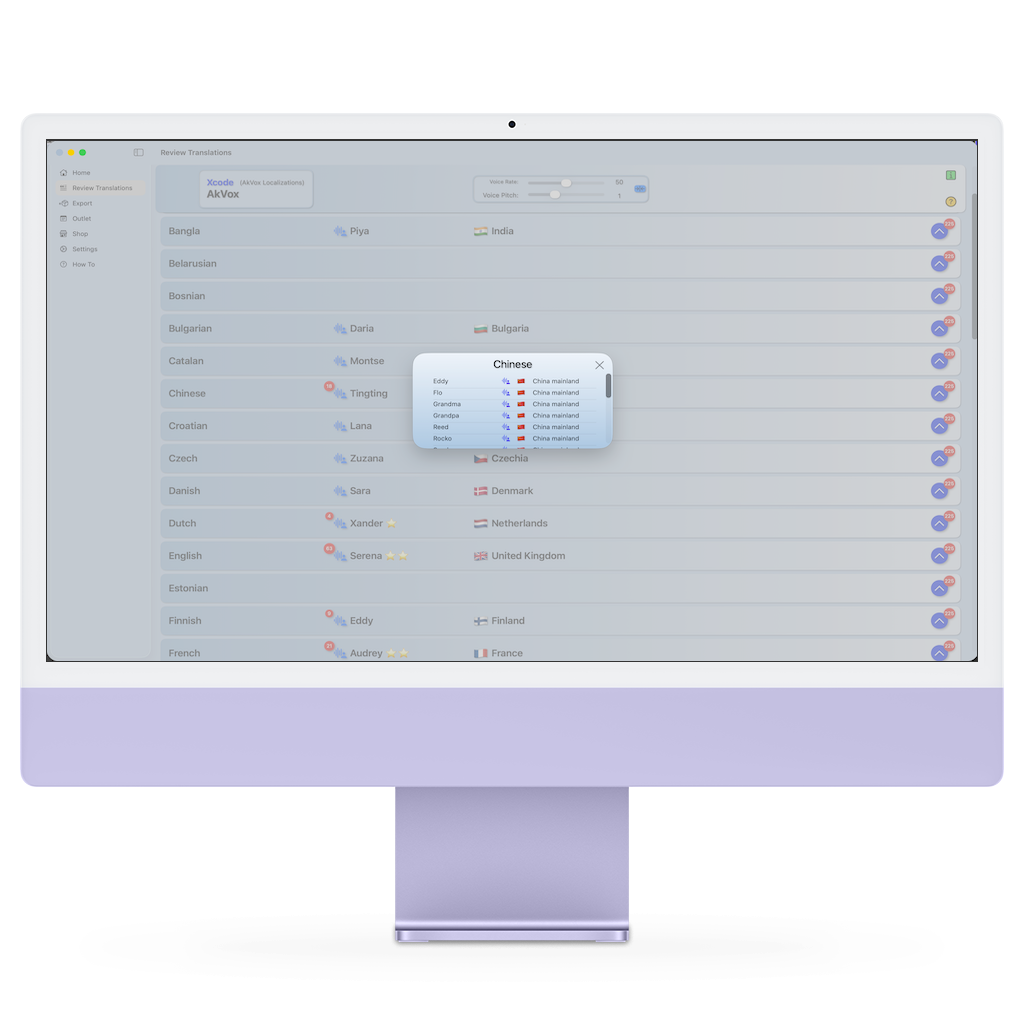
Try out AkVox now. See how easy it is to use and how quickly it translates. Listen to what your texts sound like in your language and all those you translate your app into.
You have nothing to lose, except millions upon millions of customers who don't speak your language.
 AkVox in Detail Get AkVox now!
This website does not collect any personal data from users. This means that when you visit our site, no information such as your name, email address, or browsing activity is recorded or stored. While some basic website usage data may be logged by our hosting provider for technical purposes, this information is anonymised and not used to identify individual users. We are committed to protecting your privacy and will not share any personal information with third parties as we do not gather any.
The LeMessenger App does not collect any personal data from users. This means that when you use LeMessenger, no information such as your name, email address, or any personal data is recorded or stored. We are committed to protecting your privacy and will not share any personal information with third parties as we do not gather any.
لا يجمع هذا الموقع أي بيانات شخصية من المستخدمين. هذا يعني أنه عند زيارتك لموقعنا، لا يتم تسجيل أو تخزين أي معلومات مثل اسمك أو عنوان بريدك الإلكتروني أو نشاط التصفح. قد يقوم مزود الاستضافة لدينا بتسجيل بعض بيانات استخدام الموقع الأساسية لأغراض تقنية، إلا أن هذه المعلومات مجهولة المصدر ولا تُستخدم لتحديد هوية المستخدمين. نحن ملتزمون بحماية خصوصيتك ولن نشارك أي معلومات شخصية مع أي جهات خارجية لأننا لا نجمع أيًا منها.
لا يجمع تطبيق LeMessenger أي بيانات شخصية من المستخدمين. هذا يعني أنه عند استخدامك لموقعنا، لا يتم تسجيل أو تخزين أي معلومات مثل اسمك أو عنوان بريدك الإلكتروني أو أي بيانات شخصية. نحن ملتزمون بحماية خصوصيتك ولن نشارك أي معلومات شخصية مع أي جهات خارجية لأننا لا نجمع أيًا منها.
Този уебсайт не събира никакви лични данни от потребителите. Това означава, че когато посещавате нашия сайт, никаква информация като вашето име, имейл адрес или активност при сърфиране не се записва или съхранява. Въпреки че някои основни данни за използването на уебсайта могат да бъдат регистрирани от нашия хостинг доставчик за технически цели, тази информация е анонимна и не се използва за идентифициране на отделни потребители. Ние се ангажираме да защитаваме вашата поверителност и няма да споделяме лична информация с трети страни, тъй като не събираме такава.
Приложението LeMessenger не събира никакви лични данни от потребителите. Това означава, че когато използвате LeMessenger, никаква информация като вашето име, имейл адрес или лични данни не се записва или съхранява. Ние се ангажираме да защитаваме вашата поверителност и няма да споделяме лична информация с трети страни, тъй като не събираме такава.
Aquest lloc web no recull cap dada personal dels usuaris. Això vol dir que quan visiteu el nostre lloc, no es registra ni emmagatzema cap informació com ara el vostre nom, adreça de correu electrònic o activitat de navegació. Tot i que el nostre proveïdor d'allotjament pot registrar algunes dades bàsiques d'ús del lloc web amb finalitats tècniques, aquesta informació s'anonimitza i no s'utilitza per identificar usuaris individuals. Ens comprometem a protegir la vostra privadesa i no compartirem cap informació personal amb tercers, ja que no en recollim cap.
L'aplicació LeMessenger no recull cap dada personal dels usuaris. Això vol dir que quan feu servir LeMessenger, no es registra ni emmagatzema cap informació com ara el vostre nom, adreça de correu electrònic o cap dada personal. Ens comprometem a protegir la vostra privadesa i no compartirem cap informació personal amb tercers, ja que no en recollim cap.
本網站不收集用戶的任何個人資料。這表示當您造訪我們的網站時,不會記錄或儲存您的姓名、電子郵件地址或瀏覽活動等任何資訊。雖然我們的託管服務提供者可能會出於技術目的記錄一些基本的網站使用數據,但這些資訊是匿名的,不會用於識別個人使用者。我們致力於保護您的隱私,不會與第三方分享任何個人信息,因為我們不會收集任何個人資訊。
LeMessenger 應用程式不會收集任何使用者的個人資料。這表示當您使用 LeMessenger 時,不會記錄或儲存您的姓名、電子郵件地址或任何個人資料等資訊。我們致力於保護您的隱私,不會與第三方分享任何個人信息,因為我們不會收集任何個人資訊。
Ova web stranica ne prikuplja nikakve osobne podatke korisnika. To znači da kada posjetite našu stranicu, nikakve informacije poput vašeg imena, adrese e-pošte ili aktivnosti pregledavanja ne bilježe se niti pohranjuju. Iako neki osnovni podaci o korištenju web stranice mogu biti zabilježeni od strane našeg pružatelja usluga hostinga u tehničke svrhe, ti su podaci anonimizirani i ne koriste se za identifikaciju pojedinačnih korisnika. Predani smo zaštiti vaše privatnosti i nećemo dijeliti nikakve osobne podatke s trećim stranama jer ih ne prikupljamo.
Cras imperdiet ex ac quam placerat luctus aliquam non est. Cras ut porta libero. Quisque a dui non tellus scelerisque pretium. Nullam varius posuere sem, at imperdiet velit blandit in. Fusce fermentum metus a leo convallis, quis laoreet nunc dictum. Lorem ipsum dolor sit amet, consectetur adipiscing elit. Nunc vel lacinia risus. Proin sodales et libero id consectetur.
Tento web neshromažďuje žádné osobní údaje od uživatelů. To znamená, že když navštívíte naše stránky, nebudou zaznamenány ani uloženy žádné informace, jako je vaše jméno, e-mailová adresa nebo aktivita při prohlížení. I když některé základní údaje o používání webových stránek mohou být zaznamenávány naším poskytovatelem hostingu pro technické účely, tyto informace jsou anonymizovány a nejsou používány k identifikaci jednotlivých uživatelů. Zavázali jsme se chránit vaše soukromí a nebudeme sdílet žádné osobní údaje s třetími stranami, protože žádné neshromažďujeme.
Aplikace LeMessenger neshromažďuje od uživatelů žádné osobní údaje. To znamená, že když používáte LeMessenger, nejsou zaznamenávány ani ukládány žádné informace, jako je vaše jméno, e-mailová adresa ani žádná osobní data. Zavázali jsme se chránit vaše soukromí a nebudeme sdílet žádné osobní údaje s třetími stranami, protože žádné neshromažďujeme.
Denne hjemmeside indsamler ingen personlige data fra brugere. Det betyder, at når du besøger vores websted, registreres eller gemmes ingen oplysninger såsom dit navn, din e-mailadresse eller din browseraktivitet. Mens nogle grundlæggende brugsdata for webstedet kan blive logget af vores hostingudbyder til tekniske formål, er disse oplysninger anonymiserede og bruges ikke til at identificere individuelle brugere. Vi er forpligtet til at beskytte dit privatliv og vil ikke dele nogen personlige oplysninger med tredjeparter, da vi ikke indsamler nogen.
LeMessenger-appen indsamler ingen personlige data fra brugere. Dette betyder, at når du bruger LeMessenger, registreres eller gemmes ingen oplysninger såsom dit navn, e-mailadresse eller nogen personlige data. Vi er forpligtet til at beskytte dit privatliv og vil ikke dele nogen personlige oplysninger med tredjeparter, da vi ikke indsamler nogen.
Deze website verzamelt geen persoonlijke gegevens van gebruikers. Dit betekent dat wanneer u onze site bezoekt, er geen informatie zoals uw naam, e-mailadres of browse-activiteit wordt geregistreerd of opgeslagen. Hoewel sommige basisgegevens over het gebruik van de website door onze hostingprovider kunnen worden geregistreerd voor technische doeleinden, wordt deze informatie geanonimiseerd en niet gebruikt om individuele gebruikers te identificeren. Wij zijn toegewijd aan het beschermen van uw privacy en zullen geen persoonlijke informatie delen met derden, aangezien wij geen persoonlijke informatie verzamelen.
De LeMessenger-app verzamelt geen persoonlijke gegevens van gebruikers. Dit betekent dat wanneer u LeMessenger gebruikt, er geen informatie zoals uw naam, e-mailadres of persoonlijke gegevens wordt geregistreerd of opgeslagen. Wij zijn toegewijd aan het beschermen van uw privacy en zullen geen persoonlijke informatie delen met derden, aangezien wij geen persoonlijke informatie verzamelen.
See veebisait ei kogu kasutajatelt isikuandmeid. See tähendab, et kui külastate meie saiti, ei salvestata ega salvestata mingit teavet, nagu teie nimi, e-posti aadress või sirvimistegevus. Kuigi meie hostimisteenuse pakkuja võib mõned põhilised veebisaidi kasutusandmed tehnilistel eesmärkidel logida, muudetakse see teave anonüümseks ja seda ei kasutata üksikute kasutajate tuvastamiseks. Oleme pühendunud teie privaatsuse kaitsmisele ega jaga isikuandmeid kolmandate osapooltega, kuna me ei kogu seda.
LeMessenger App ei kogu kasutajatelt isikuandmeid. See tähendab, et kui kasutate LeMessengeri, ei salvestata ega salvestata mingit teavet, nagu teie nimi, e-posti aadress ega muud isikuandmed. Oleme pühendunud teie privaatsuse kaitsmisele ega jaga isikuandmeid kolmandate osapooltega, kuna me ei kogu seda.
Tämä sivusto ei kerää henkilötietoja käyttäjiltä. Tämä tarkoittaa, että kun vierailet sivustollamme, mitään tietoja, kuten nimeäsi, sähköpostiosoitettasi tai selaustoimintaa, ei tallenneta tai tallenneta. Vaikka isännöintipalveluntarjoajamme saattaa kirjata joitakin verkkosivuston peruskäyttötietoja teknisiä tarkoituksia varten, nämä tiedot anonymisoidaan, eikä niitä käytetä yksittäisten käyttäjien tunnistamiseen. Olemme sitoutuneet suojelemaan yksityisyyttäsi emmekä jaa henkilökohtaisia tietoja kolmansille osapuolille, koska emme kerää niitä.
LeMessenger App ei kerää henkilötietoja käyttäjiltä. Tämä tarkoittaa, että kun käytät LeMessengeria, mitään tietoja, kuten nimeäsi, sähköpostiosoitettasi tai henkilökohtaisia tietojasi, ei tallenneta tai tallenneta. Olemme sitoutuneet suojelemaan yksityisyyttäsi emmekä jaa henkilökohtaisia tietoja kolmansille osapuolille, koska emme kerää niitä.
Ce site web ne collecte aucune donnée personnelle de ses utilisateurs. Cela signifie que lorsque vous visitez notre site, aucune information telle que votre nom, votre adresse e-mail ou votre activité de navigation n'est enregistrée ni stockée. Bien que certaines données d'utilisation du site web puissent être enregistrées par notre hébergeur à des fins techniques, ces informations sont anonymisées et ne permettent pas d'identifier les utilisateurs. Nous nous engageons à protéger votre vie privée et ne partagerons aucune information personnelle avec des tiers, car nous n'en collectons aucune
L'application LeMessenger ne collecte aucune donnée personnelle de ses utilisateurs. Cela signifie que lorsque vous utilisez LeMessenger, aucune information telle que votre nom, votre adresse e-mail ou toute autre donnée personnelle n'est enregistrée ni stockée. Nous nous engageons à protéger votre vie privée et ne partagerons aucune information personnelle avec des tiers, car nous n'en collectons aucune.
Diese Website erhebt keine personenbezogenen Daten von Nutzern. Das bedeutet, dass bei Ihrem Besuch auf unserer Website keine Informationen wie Ihr Name, Ihre E-Mail-Adresse oder Ihr Browserverhalten erfasst oder gespeichert werden. Zwar protokolliert unser Hosting-Anbieter aus technischen Gründen einige grundlegende Nutzungsdaten der Website, diese Informationen sind jedoch anonymisiert und werden nicht zur Identifizierung einzelner Nutzer verwendet. Wir verpflichten uns zum Schutz Ihrer Privatsphäre und geben keine personenbezogenen Daten an Dritte weiter, da wir selbst keine erheben.
Die LeMessenger App erhebt keine personenbezogenen Daten von Nutzern. Das bedeutet, dass bei Ihrer Nutzung von LeMessenger keine Informationen wie Ihr Name, Ihre E-Mail-Adresse oder andere personenbezogene Daten erfasst oder gespeichert werden. Wir verpflichten uns zum Schutz Ihrer Privatsphäre und geben keine personenbezogenen Daten an Dritte weiter, da wir selbst keine erheben.
Αυτός ο ιστότοπος δεν συλλέγει προσωπικά δεδομένα από χρήστες. Αυτό σημαίνει ότι όταν επισκέπτεστε τον ιστότοπό μας, δεν καταγράφονται ούτε αποθηκεύονται πληροφορίες όπως το όνομά σας, η διεύθυνση email ή η δραστηριότητα περιήγησης. Ενώ ορισμένα βασικά δεδομένα χρήσης ιστότοπου ενδέχεται να καταγράφονται από τον πάροχο φιλοξενίας μας για τεχνικούς σκοπούς, αυτές οι πληροφορίες είναι ανώνυμες και δεν χρησιμοποιούνται για την αναγνώριση μεμονωμένων χρηστών. Δεσμευόμαστε να προστατεύσουμε το απόρρητό σας και δεν θα κοινοποιήσουμε προσωπικές πληροφορίες με τρίτους καθώς δεν συλλέγουμε.
Η εφαρμογή LeMessenger δεν συλλέγει προσωπικά δεδομένα από χρήστες. Αυτό σημαίνει ότι όταν χρησιμοποιείτε το LeMessenger, δεν καταγράφονται ή αποθηκεύονται πληροφορίες όπως το όνομά σας, η διεύθυνση email σας ή οποιαδήποτε προσωπικά δεδομένα. Δεσμευόμαστε να προστατεύσουμε το απόρρητό σας και δεν θα κοινοποιήσουμε προσωπικές πληροφορίες με τρίτους καθώς δεν συλλέγουμε.
אתר זה אינו אוסף כל מידע אישי ממשתמשים. משמעות הדבר היא שכאשר אתה מבקר באתר שלנו, שום מידע כגון שמך, כתובת הדואר האלקטרוני שלך או פעילות הגלישה שלך אינו מתועד או מאוחסן. בעוד שחלק נתוני השימוש הבסיסיים באתר עשויים להירשם על ידי ספק האירוח שלנו למטרות טכניות, מידע זה הוא אנונימי ואינו משמש לזיהוי משתמשים בודדים. אנו מחויבים להגן על פרטיותך ולא נשתף מידע אישי עם צדדים שלישיים מכיוון שאיננו אוספים מידע.
אפליקציית LeMessenger אינה אוספת נתונים אישיים ממשתמשים. המשמעות היא שכאשר אתה משתמש ב-LeMessenger, שום מידע כגון שמך, כתובת הדואר האלקטרוני שלך או כל מידע אישי אינו מתועד או מאוחסן. אנו מחויבים להגן על פרטיותך ולא נשתף מידע אישי עם צדדים שלישיים מכיוון שאיננו אוספים מידע
यह वेबसाइट उपयोगकर्ताओं से कोई भी व्यक्तिगत डेटा एकत्र नहीं करती है। इसका मतलब है कि जब आप हमारी साइट पर जाते हैं, तो आपका नाम, ईमेल पता या ब्राउज़िंग गतिविधि जैसी कोई भी जानकारी रिकॉर्ड या संग्रहीत नहीं की जाती है। जबकि कुछ बुनियादी वेबसाइट उपयोग डेटा हमारे होस्टिंग प्रदाता द्वारा तकनीकी उद्देश्यों के लिए लॉग किया जा सकता है, यह जानकारी गुमनाम है और व्यक्तिगत उपयोगकर्ताओं की पहचान करने के लिए उपयोग नहीं की जाती है। हम आपकी गोपनीयता की रक्षा करने के लिए प्रतिबद्ध हैं और किसी भी व्यक्तिगत जानकारी को तीसरे पक्ष के साथ साझा नहीं करेंगे क्योंकि हम कोई भी जानकारी एकत्र नहीं करते हैं।
LeMessenger ऐप उपयोगकर्ताओं से कोई भी व्यक्तिगत डेटा एकत्र नहीं करता है। इसका मतलब है कि जब आप LeMessenger का उपयोग करते हैं, तो आपका नाम, ईमेल पता या कोई भी व्यक्तिगत डेटा रिकॉर्ड या संग्रहीत नहीं किया जाता है। हम आपकी गोपनीयता की रक्षा करने के लिए प्रतिबद्ध हैं और किसी भी व्यक्तिगत जानकारी को तीसरे पक्ष के साथ साझा नहीं करेंगे क्योंकि हम कोई भी जानकारी एकत्र नहीं करते हैं।
Ez a weboldal nem gyűjt személyes adatokat a felhasználóktól. Ez azt jelenti, hogy amikor meglátogatja oldalunkat, semmilyen információ, például neve, e-mail címe vagy böngészési tevékenysége nem kerül rögzítésre vagy tárolásra. Bár egyes alapvető webhelyhasználati adatokat tárhelyszolgáltatónk technikai célból naplózhat, ezeket az információkat anonimizáljuk, és nem használják fel az egyes felhasználók azonosítására. Elkötelezettek vagyunk az Ön adatainak védelme mellett, és nem osztunk meg semmilyen személyes információt harmadik felekkel, mivel nem gyűjtünk ilyeneket.
A LeMessenger App nem gyűjt személyes adatokat a felhasználóktól. Ez azt jelenti, hogy a LeMessenger használatakor semmilyen információ, például neve, e-mail címe vagy bármilyen személyes adat nem kerül rögzítésre vagy tárolásra. Elkötelezettek vagyunk az Ön adatainak védelme mellett, és nem osztunk meg semmilyen személyes információt harmadik felekkel, mivel nem gyűjtünk ilyeneket.
Þessi vefsíða safnar engum persónulegum gögnum frá notendum. Þetta þýðir að þegar þú heimsækir síðuna okkar eru engar upplýsingar eins og nafn þitt, netfang eða vafravirkni skráð eða geymd. Þó að hýsingaraðili okkar gæti skráð sum grunnnotkunargögn á vefsíðunni í tæknilegum tilgangi, eru þessar upplýsingar nafnlausar og ekki notaðar til að auðkenna einstaka notendur. Við erum staðráðin í að vernda friðhelgi þína og munum ekki deila neinum persónulegum upplýsingum með þriðja aðila þar sem við söfnum engum.
LeMessenger appið safnar engum persónulegum gögnum frá notendum. Þetta þýðir að þegar þú notar LeMessenger eru engar upplýsingar eins og nafn þitt, netfang eða persónuleg gögn skráð eða geymd. Við erum staðráðin í að vernda friðhelgi þína og munum ekki deila neinum persónulegum upplýsingum með þriðja aðila þar sem við söfnum engum.
Situs web ini tidak mengumpulkan data pribadi apa pun dari pengguna. Ini berarti bahwa saat Anda mengunjungi situs kami, tidak ada informasi seperti nama, alamat email, atau aktivitas penelusuran Anda yang direkam atau disimpan. Meskipun beberapa data penggunaan situs web dasar mungkin dicatat oleh penyedia hosting kami untuk tujuan teknis, informasi ini dianonimkan dan tidak digunakan untuk mengidentifikasi pengguna individu. Kami berkomitmen untuk melindungi privasi Anda dan tidak akan membagikan informasi pribadi apa pun dengan pihak ketiga karena kami tidak mengumpulkan apa pun.
Aplikasi LeMessenger tidak mengumpulkan data pribadi apa pun dari pengguna. Ini berarti bahwa saat Anda menggunakan LeMessenger, tidak ada informasi seperti nama, alamat email, atau data pribadi apa pun yang direkam atau disimpan. Kami berkomitmen untuk melindungi privasi Anda dan tidak akan membagikan informasi pribadi apa pun dengan pihak ketiga karena kami tidak mengumpulkan apa pun.
Questo sito Web non raccoglie alcun dato personale dagli utenti. Ciò significa che quando visiti il nostro sito, nessuna informazione come il tuo nome, indirizzo e-mail o attività di navigazione viene registrata o archiviata. Mentre alcuni dati di base sull'utilizzo del sito Web possono essere registrati dal nostro provider di hosting per scopi tecnici, queste informazioni sono rese anonime e non utilizzate per identificare singoli utenti. Ci impegniamo a proteggere la tua privacy e non condivideremo alcuna informazione personale con terze parti poiché non ne raccogliamo alcuna.
L'app LeMessenger non raccoglie alcun dato personale dagli utenti. Ciò significa che quando utilizzi LeMessenger, nessuna informazione come il tuo nome, indirizzo e-mail o dati personali viene registrata o archiviata. Ci impegniamo a proteggere la tua privacy e non condivideremo alcuna informazione personale con terze parti poiché non ne raccogliamo alcuna.
このウェブサイトはユーザーから個人データを収集しません。つまり、お客様が当サイトにアクセスしても、お客様の名前、メールアドレス、閲覧アクティビティなどの情報は記録または保存されません。一部の基本的なウェブサイト使用データは、技術的な目的でホスティング プロバイダーによって記録される場合がありますが、この情報は匿名化されており、個々のユーザーを識別するために使用されることはありません。当社はお客様のプライバシーを保護することに尽力しており、個人情報を第三者と共有することはありません。なぜなら、当社は個人情報を一切収集していないからです。
LeMessenger アプリはユーザーから個人データを収集しません。つまり、お客様が LeMessenger を使用する際、お客様の名前、メールアドレス、個人データなどの情報は記録または保存されません。当社はお客様のプライバシーを保護することに尽力しており、個人情報を第三者と共有することはありません。なぜなら、当社は個人情報を一切収集していないからです
이 웹사이트는 사용자로부터 개인 데이터를 수집하지 않습니다. 즉, 귀하가 당사 사이트를 방문할 때 귀하의 이름, 이메일 주소 또는 검색 활동과 같은 정보는 기록되거나 저장되지 않습니다. 일부 기본 웹사이트 사용 데이터는 기술적 목적으로 당사 호스팅 제공업체에서 기록할 수 있지만, 이 정보는 익명화되어 개별 사용자를 식별하는 데 사용되지 않습니다. 당사는 귀하의 개인 정보를 보호하는 데 전념하며 개인 정보를 수집하지 않으므로 제3자와 개인 정보를 공유하지 않습니다.
LeMessenger 앱은 사용자로부터 개인 데이터를 수집하지 않습니다. 즉, 귀하가 LeMessenger를 사용할 때 귀하의 이름, 이메일 주소 또는 개인 데이터와 같은 정보는 기록되거나 저장되지 않습니다. 당사는 귀하의 개인 정보를 보호하는 데 전념하며 개인 정보를 수집하지 않으므로 제3자와 개인 정보를 공유하지 않습니다.
Šī vietne neievāc nekādus lietotāju personas datus. Tas nozīmē, ka, apmeklējot mūsu vietni, nekāda informācija, piemēram, jūsu vārds, e-pasta adrese vai pārlūkošanas darbība, netiek ierakstīta vai saglabāta. Lai gan mūsu mitināšanas pakalpojumu sniedzējs tehniskiem nolūkiem var reģistrēt dažus tīmekļa vietnes lietošanas pamatdatus, šī informācija tiek anonimizēta un netiek izmantota atsevišķu lietotāju identificēšanai. Mēs esam apņēmušies aizsargāt jūsu privātumu un neizpaudīsim nekādu personisko informāciju ar trešajām pusēm, jo mēs to nevācam.
LeMessenger App neievāc nekādus personas datus no lietotājiem. Tas nozīmē, ka, izmantojot LeMessenger, netiek ierakstīta vai saglabāta nekāda informācija, piemēram, jūsu vārds, e-pasta adrese vai jebkādi personas dati. Mēs esam apņēmušies aizsargāt jūsu privātumu un neizpaudīsim nekādu personisko informāciju ar trešajām pusēm, jo mēs to nevācam.
Ši svetainė nerenka jokių asmeninių duomenų iš vartotojų. Tai reiškia, kad kai lankotės mūsų svetainėje, jokia informacija, tokia kaip jūsų vardas, el. pašto adresas ar naršymo veikla, neįrašoma ir nesaugoma. Nors kai kuriuos pagrindinius svetainės naudojimo duomenis mūsų prieglobos paslaugų teikėjas gali registruoti techniniais tikslais, ši informacija yra anonimizuota ir nenaudojama atskiriems vartotojams identifikuoti. Esame įsipareigoję apsaugoti jūsų privatumą ir nesidalinsime jokios asmeninės informacijos su trečiosiomis šalimis, nes jos nerenkame.
LeMessenger App nerenka jokių asmeninių duomenų iš vartotojų. Tai reiškia, kad kai naudojatės LeMessenger, jokia informacija, tokia kaip jūsų vardas, el. pašto adresas ar bet kokie asmeniniai duomenys, neįrašoma ir nesaugoma. Esame įsipareigoję apsaugoti jūsų privatumą ir nesidalinsime jokios asmeninės informacijos su trečiosiomis šalimis, nes jos nerenkame.
Laman web ini tidak mengumpul sebarang data peribadi daripada pengguna. Ini bermakna apabila anda melawat tapak kami, tiada maklumat seperti nama, alamat e-mel atau aktiviti penyemakan imbas anda direkodkan atau disimpan. Walaupun beberapa data penggunaan tapak web asas mungkin dilog oleh pembekal pengehosan kami untuk tujuan teknikal, maklumat ini tidak dikenali dan tidak digunakan untuk mengenal pasti pengguna individu. Kami komited untuk melindungi privasi anda dan tidak akan berkongsi sebarang maklumat peribadi dengan pihak ketiga kerana kami tidak mengumpul apa-apa.
Apl LeMessenger tidak mengumpul sebarang data peribadi daripada pengguna. Ini bermakna apabila anda menggunakan LeMessenger, tiada maklumat seperti nama, alamat e-mel atau sebarang data peribadi anda direkodkan atau disimpan. Kami komited untuk melindungi privasi anda dan tidak akan berkongsi sebarang maklumat peribadi dengan pihak ketiga kerana kami tidak mengumpul apa-apa.
Denne nettsiden samler ingen personopplysninger fra brukere. Dette betyr at når du besøker nettstedet vårt, blir ingen informasjon som navn, e-postadresse eller surfeaktivitet registrert eller lagret. Selv om noen grunnleggende bruksdata for nettstedet kan logges av vår vertsleverandør for tekniske formål, er denne informasjonen anonymisert og brukes ikke til å identifisere individuelle brukere. Vi er forpliktet til å beskytte personvernet ditt og vil ikke dele noen personlig informasjon med tredjeparter da vi ikke samler inn noen.
LeMessenger-appen samler ingen personlige data fra brukere. Dette betyr at når du bruker LeMessenger, registreres eller lagres ingen informasjon som navn, e-postadresse eller personlige data. Vi er forpliktet til å beskytte personvernet ditt og vil ikke dele noen personlig informasjon med tredjeparter da vi ikke samler inn noen.
Ta strona internetowa nie zbiera żadnych danych osobowych użytkowników. Oznacza to, że gdy odwiedzasz naszą stronę, żadne informacje, takie jak Twoje imię, adres e-mail lub aktywność przeglądania, nie są rejestrowane ani przechowywane. Podczas gdy niektóre podstawowe dane dotyczące korzystania ze strony internetowej mogą być rejestrowane przez naszego dostawcę hostingu w celach technicznych, informacje te są anonimizowane i nie są wykorzystywane do identyfikacji poszczególnych użytkowników. Zobowiązujemy się chronić Twoją prywatność i nie będziemy udostępniać żadnych danych osobowych osobom trzecim, ponieważ ich nie gromadzimy.
Aplikacja LeMessenger nie zbiera żadnych danych osobowych użytkowników. Oznacza to, że gdy korzystasz z LeMessenger, żadne informacje, takie jak Twoje imię, adres e-mail lub jakiekolwiek dane osobowe, nie są rejestrowane ani przechowywane. Zobowiązujemy się chronić Twoją prywatność i nie będziemy udostępniać żadnych danych osobowych osobom trzecim, ponieważ ich nie gromadzimy.
Este site não recolhe quaisquer dados pessoais dos utilizadores. Isto significa que quando visita o nosso website, nenhuma informação como o seu nome, endereço de e-mail ou atividade de navegação é registada ou armazenada. Embora alguns dados básicos de utilização do website possam ser registados pelo nosso fornecedor de alojamento para fins técnicos, estas informações são anónimas e não são utilizadas para identificar utilizadores individuais. Estamos empenhados em proteger a sua privacidade e não partilharemos qualquer informação pessoal com terceiros, uma vez que não recolhemos nenhuma.
A aplicação LeMessenger não recolhe nenhum dado pessoal dos utilizadores. Isto significa que quando utiliza o LeMessenger, nenhuma informação como o seu nome, endereço de e-mail ou quaisquer dados pessoais é registada ou armazenada. Estamos empenhados em proteger a sua privacidade e não partilharemos qualquer informação pessoal com terceiros, uma vez que não recolhemos nenhuma.
Acest site web nu colectează date personale de la utilizatori. Aceasta înseamnă că atunci când vizitați site-ul nostru, nu sunt înregistrate sau stocate informații precum numele, adresa dvs. de e-mail sau activitatea de navigare. Deși unele date de utilizare de bază a site-ului web pot fi înregistrate de furnizorul nostru de găzduire în scopuri tehnice, aceste informații sunt anonimizate și nu sunt utilizate pentru a identifica utilizatorii individuali. Ne angajăm să vă protejăm confidențialitatea și nu vom împărtăși nicio informație cu caracter personal cu terțe părți, deoarece nu adunăm niciuna.
Aplicația LeMessenger nu colectează date personale de la utilizatori. Aceasta înseamnă că atunci când utilizați LeMessenger, nu sunt înregistrate sau stocate informații precum numele, adresa dvs. de e-mail sau orice date cu caracter personal. Ne angajăm să vă protejăm confidențialitatea și nu vom împărtăși nicio informație cu caracter personal cu terțe părți, deoarece nu adunăm niciuna.
Этот веб-сайт не собирает никаких персональных данных пользователей. Это означает, что когда вы посещаете наш сайт, никакая информация, такая как ваше имя, адрес электронной почты или активность просмотра, не записывается и не сохраняется. Хотя некоторые основные данные об использовании веб-сайта могут регистрироваться нашим хостинг-провайдером в технических целях, эта информация анонимна и не используется для идентификации отдельных пользователей. Мы стремимся защищать вашу конфиденциальность и не будем передавать никакую личную информацию третьим лицам, поскольку мы ее не собираем.
Приложение LeMessenger не собирает никаких персональных данных пользователей. Это означает, что когда вы используете LeMessenger, никакая информация, такая как ваше имя, адрес электронной почты или любые персональные данные, не записывается и не сохраняется. Мы стремимся защищать вашу конфиденциальность и не будем передавать никакую личную информацию третьим лицам, поскольку мы ее не собираем.
Táto webová stránka nezhromažďuje žiadne osobné údaje od používateľov. To znamená, že pri návšteve našej stránky sa nezaznamenávajú ani neukladajú žiadne informácie, ako je vaše meno, e-mailová adresa alebo aktivita pri prehliadaní. Aj keď niektoré základné údaje o používaní webových stránok môže náš poskytovateľ hostingu zaznamenávať na technické účely, tieto informácie sú anonymizované a nepoužívajú sa na identifikáciu jednotlivých používateľov. Zaviazali sme sa chrániť vaše súkromie a nebudeme zdieľať žiadne osobné informácie s tretími stranami, pretože žiadne nezhromažďujeme.
Aplikácia LeMessenger nezhromažďuje od používateľov žiadne osobné údaje. To znamená, že keď používate LeMessenger, nezaznamenávajú sa ani neukladajú žiadne informácie, ako je vaše meno, e-mailová adresa ani žiadne osobné údaje. Zaviazali sme sa chrániť vaše súkromie a nebudeme zdieľať žiadne osobné informácie s tretími stranami, pretože žiadne nezhromažďujeme.
Ta spletna stran ne zbira nobenih osebnih podatkov uporabnikov. To pomeni, da ko obiščete naše spletno mesto, se ne zabeležijo ali shranijo nobeni podatki, kot so vaše ime, e-poštni naslov ali dejavnost brskanja. Čeprav lahko naš ponudnik gostovanja za tehnične namene zabeleži nekatere osnovne podatke o uporabi spletnega mesta, so ti podatki anonimizirani in se ne uporabljajo za identifikacijo posameznih uporabnikov. Zavezani smo k varovanju vaše zasebnosti in nobenih osebnih podatkov ne bomo delili s tretjimi osebami, saj jih ne zbiramo.
Aplikacija LeMessenger ne zbira osebnih podatkov uporabnikov. To pomeni, da ko uporabljate LeMessenger, se ne beležijo ali shranjujejo nobeni podatki, kot so vaše ime, e-poštni naslov ali kakršni koli osebni podatki. Zavezani smo k varovanju vaše zasebnosti in nobenih osebnih podatkov ne bomo delili s tretjimi osebami, saj jih ne zbiramo.
Este sitio web no recopila datos personales de los usuarios. Esto significa que, al visitar nuestro sitio, no se registra ni almacena información como su nombre, dirección de correo electrónico ni actividad de navegación. Si bien nuestro proveedor de alojamiento puede registrar algunos datos básicos de uso del sitio web con fines técnicos, esta información se anonimiza y no se utiliza para identificar a usuarios individuales. Nos comprometemos a proteger su privacidad y no compartiremos ningún dato personal con terceros, ya que no lo recopilamos.
La aplicación LeMessenger no recopila datos personales de los usuarios. Esto significa que, al usar LeMessenger, no se registra ni almacena información como su nombre, dirección de correo electrónico ni ningún otro dato personal. Nos comprometemos a proteger su privacidad y no compartiremos ningún dato personal con terceros, ya que no lo recopilamos.
Denna webbplats samlar inte in några personliga uppgifter från användare. Det betyder att när du besöker vår webbplats registreras eller lagras ingen information som ditt namn, din e-postadress eller surfaktivitet. Även om vissa grundläggande webbplatsanvändningsdata kan loggas av vår webbhotell för tekniska ändamål, är denna information anonymiserad och används inte för att identifiera enskilda användare. Vi är angelägna om att skydda din integritet och kommer inte att dela någon personlig information med tredje part eftersom vi inte samlar in någon.
LeMessenger-appen samlar inte in några personliga uppgifter från användare. Detta innebär att när du använder LeMessenger, registreras eller lagras ingen information såsom ditt namn, e-postadress eller någon personlig information. Vi är angelägna om att skydda din integritet och kommer inte att dela någon personlig information med tredje part eftersom vi inte samlar in någon.
เว็บไซต์นี้ไม่ได้รวบรวมข้อมูลส่วนตัวใดๆ จากผู้ใช้ ซึ่งหมายความว่าเมื่อคุณเยี่ยมชมไซต์ของเรา จะไม่มีการบันทึกหรือจัดเก็บข้อมูลใดๆ เช่น ชื่อ ที่อยู่อีเมล หรือกิจกรรมการท่องเว็บของคุณ แม้ว่าผู้ให้บริการโฮสติ้งของเราอาจบันทึกข้อมูลการใช้งานเว็บไซต์พื้นฐานบางส่วนเพื่อวัตถุประสงค์ทางเทคนิค แต่ข้อมูลนี้จะไม่ระบุตัวตนและจะไม่ใช้เพื่อระบุตัวตนของผู้ใช้แต่ละราย เราให้คำมั่นว่าจะปกป้องความเป็นส่วนตัวของคุณและจะไม่แบ่งปันข้อมูลส่วนบุคคลใดๆ กับบุคคลที่สาม เนื่องจากเราไม่ได้รวบรวมข้อมูลใดๆ
แอป LeMessenger ไม่รวบรวมข้อมูลส่วนตัวใดๆ จากผู้ใช้ ซึ่งหมายความว่าเมื่อคุณใช้ LeMessenger จะไม่มีการบันทึกหรือจัดเก็บข้อมูลใดๆ เช่น ชื่อ ที่อยู่อีเมล หรือข้อมูลส่วนบุคคลใดๆ ของคุณ เราให้คำมั่นว่าจะปกป้องความเป็นส่วนตัวของคุณและจะไม่แบ่งปันข้อมูลส่วนบุคคลใดๆ กับบุคคลที่สาม เนื่องจากเราไม่ได้รวบรวมข้อมูลใดๆ
Bu web sitesi kullanıcılardan herhangi bir kişisel veri toplamaz. Bu, sitemizi ziyaret ettiğinizde adınız, e-posta adresiniz veya tarama etkinliğiniz gibi hiçbir bilginin kaydedilmediği veya saklanmadığı anlamına gelir. Bazı temel web sitesi kullanım verileri teknik amaçlar için barındırma sağlayıcımız tarafından kaydedilebilirken, bu bilgiler anonimleştirilir ve bireysel kullanıcıları tanımlamak için kullanılmaz. Gizliliğinizi korumayı taahhüt ediyoruz ve hiçbir kişisel bilgiyi üçüncü taraflarla paylaşmayacağız çünkü hiçbirini toplamıyoruz.
LeMessenger Uygulaması kullanıcılardan herhangi bir kişisel veri toplamaz. Bu, LeMessenger'u kullandığınızda adınız, e-posta adresiniz veya herhangi bir kişisel veri gibi hiçbir bilginin kaydedilmediği veya saklanmadığı anlamına gelir. Gizliliğinizi korumayı taahhüt ediyoruz ve hiçbir kişisel bilgiyi üçüncü taraflarla paylaşmayacağız çünkü hiçbirini toplamıyoruz.
Цей веб-сайт не збирає жодних особистих даних користувачів. Це означає, що коли ви відвідуєте наш сайт, жодна така інформація, як ваше ім’я, адреса електронної пошти чи дії веб-переглядача, не записується та не зберігається. Хоча деякі основні дані про використання веб-сайту можуть реєструватися нашим хостинг-провайдером для технічних цілей, ця інформація анонімна і не використовується для ідентифікації окремих користувачів. Ми прагнемо захищати вашу конфіденційність і не передаватимемо жодної особистої інформації третім сторонам, оскільки ми її не збираємо.
Додаток LeMessenger не збирає особисті дані користувачів. Це означає, що коли ви використовуєте LeMessenger, жодна така інформація, як ваше ім’я, адреса електронної пошти чи будь-які особисті дані, не записуються та не зберігаються. Ми прагнемо захищати вашу конфіденційність і не передаватимемо жодної особистої інформації третім сторонам, оскільки ми її не збираємо.
Trang web này không thu thập bất kỳ dữ liệu cá nhân nào từ người dùng. Điều này có nghĩa là khi bạn truy cập trang web của chúng tôi, không có thông tin nào như tên, địa chỉ email hoặc hoạt động duyệt web của bạn được ghi lại hoặc lưu trữ. Mặc dù một số dữ liệu sử dụng trang web cơ bản có thể được nhà cung cấp dịch vụ lưu trữ của chúng tôi ghi lại cho mục đích kỹ thuật, nhưng thông tin này được ẩn danh và không được sử dụng để xác định người dùng cá nhân. Chúng tôi cam kết bảo vệ quyền riêng tư của bạn và sẽ không chia sẻ bất kỳ thông tin cá nhân nào với bên thứ ba vì chúng tôi không thu thập bất kỳ thông tin nào.
Ứng dụng LeMessenger không thu thập bất kỳ dữ liệu cá nhân nào từ người dùng. Điều này có nghĩa là khi bạn sử dụng LeMessenger, không có thông tin nào như tên, địa chỉ email hoặc bất kỳ dữ liệu cá nhân nào được ghi lại hoặc lưu trữ. Chúng tôi cam kết bảo vệ quyền riêng tư của bạn và sẽ không chia sẻ bất kỳ thông tin cá nhân nào với bên thứ ba vì chúng tôi không thu thập bất kỳ thông tin nào.